How to make an AI film

Stay on top of the best AI models

Video models
- 1Seedance 2.5ByteDance
- 2Seedance 2.0ByteDance
- 3Wan 3.0Alibaba
Image models
- 1Seedream 5.0 ProByteDance
- 2Nano Banana ProGoogle
- 3GPT Image 2OpenAI
Ranked for film by OpenArt Arena, a blind panel of working directors and artists. Snapshot 15 September 2026. Full breakdown in the questions below.
This is how a J2 industries film actually gets made. No secret prompt, no magic setting, just a running order that works. Build the world, lock your characters, then start shooting. All of it runs inside OpenArt.
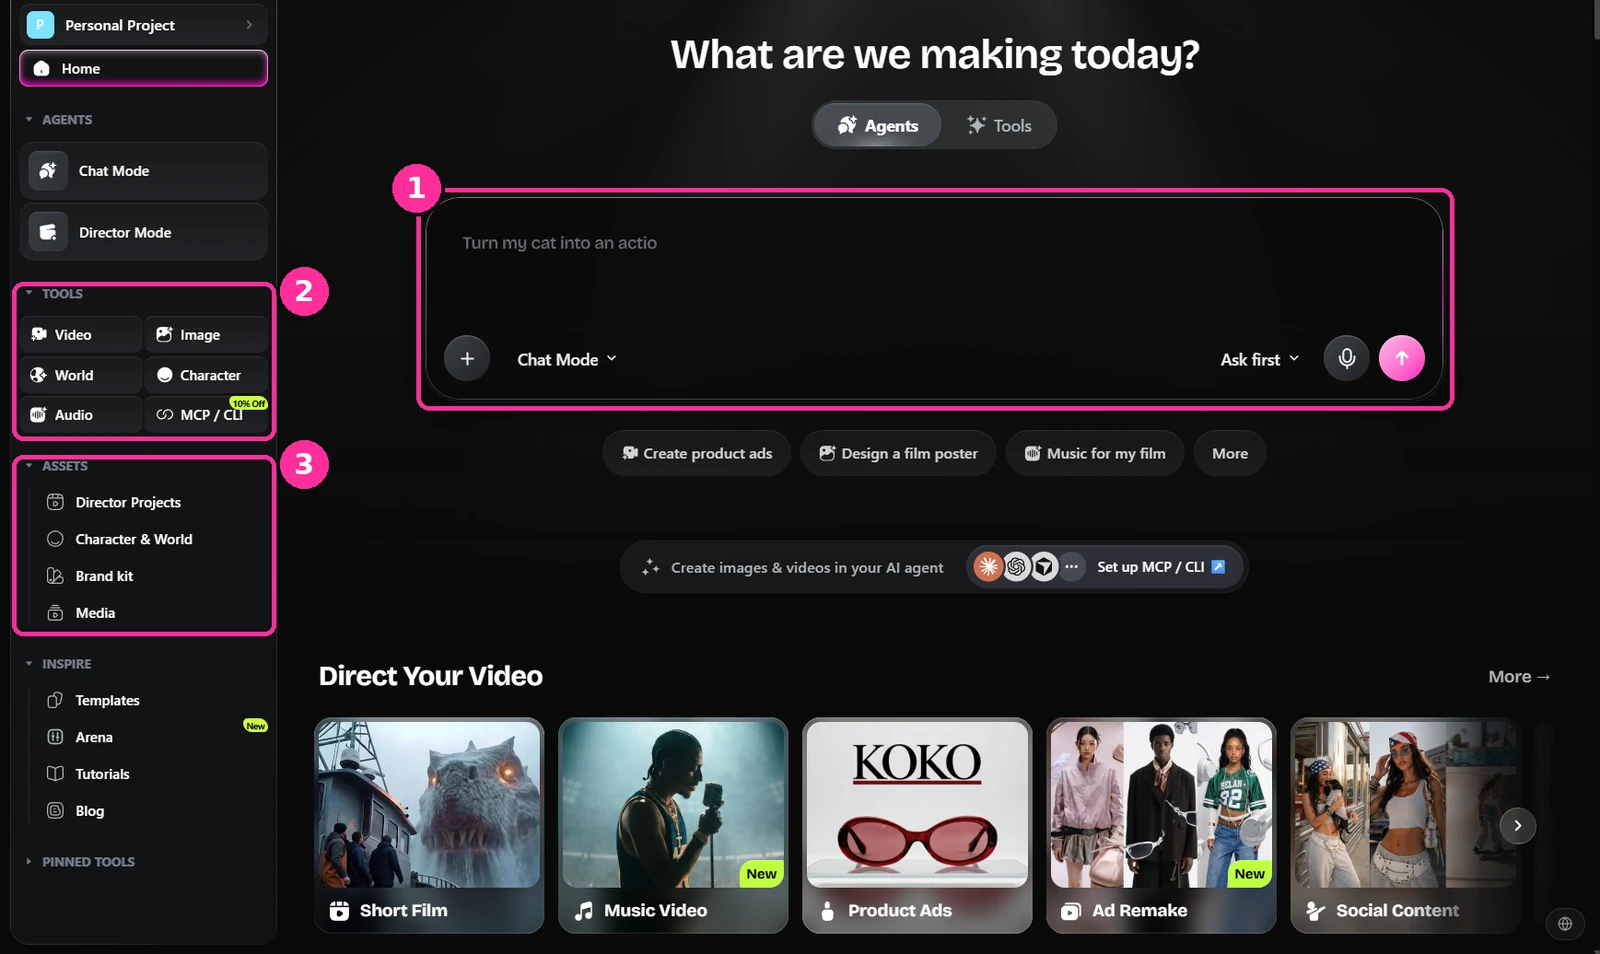
- The prompt box. Everything starts here. Work through it in chat, or go straight to a tool.
- Tools. Video, image, world, character and audio. You'll live in this list.
- Assets. Your saved characters, worlds and media. Anything you lock in step three lands here and gets reused.
Build the location
Start with the place, not the shot. Generate the environment in Seedream 5.0 Pro or GPT Image 2 and describe it like a location scout would: architecture, time of day, weather, light. Leave the camera out for now.
Make several angles while you're there. You'll need them later, and doing them in one go keeps them consistent.
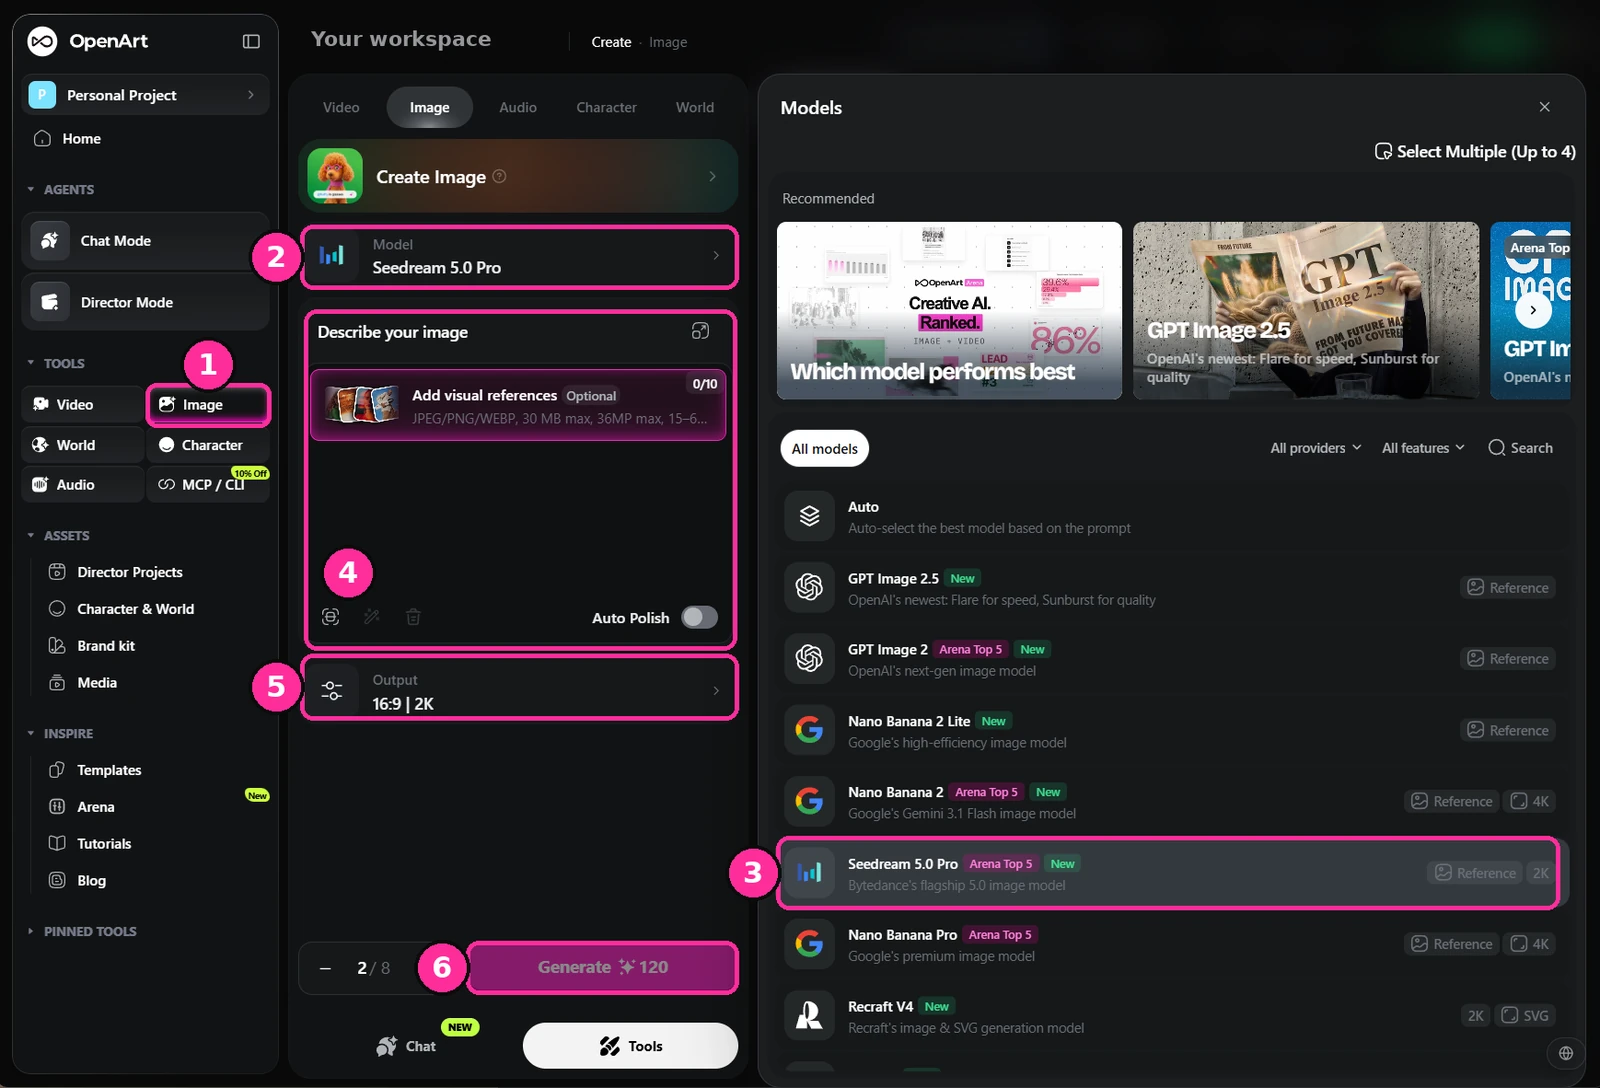
- Image. Pick the image tool from the sidebar.
- Model. Click the model row to change what you're generating with.
- Seedream 5.0 Pro. What I use for locations and character stills. GPT Image 2 is the other one worth a look.
- Prompt. Write the location here. References are optional at this stage, because you're creating the look rather than matching one.
- Output. Set your aspect ratio and resolution. I work 21:9 at 2K for anything that ends up on screen.
- Generate. Run a batch rather than one at a time. You want options.
Here's the shape of the prompt behind the location below. Label the parts, so you can change one without disturbing the rest.
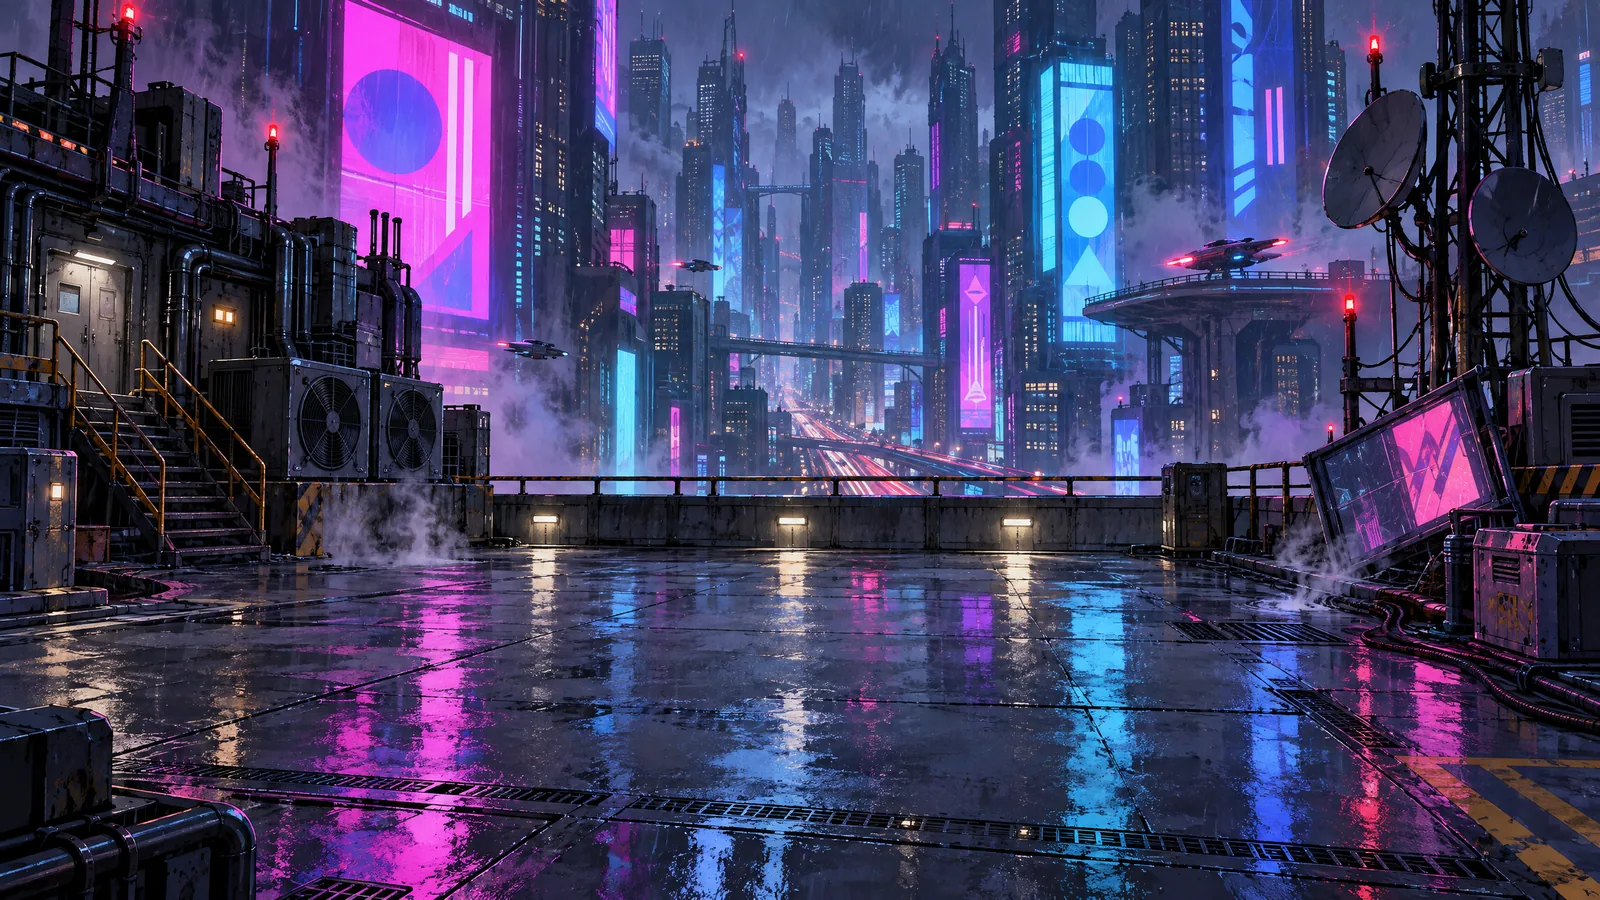
That's the plate the rest of the scene gets built on. Notice how much empty deck sits in the middle. That space is deliberate.
There's a second route if you want to move a camera around inside a location instead of generating flat stills.
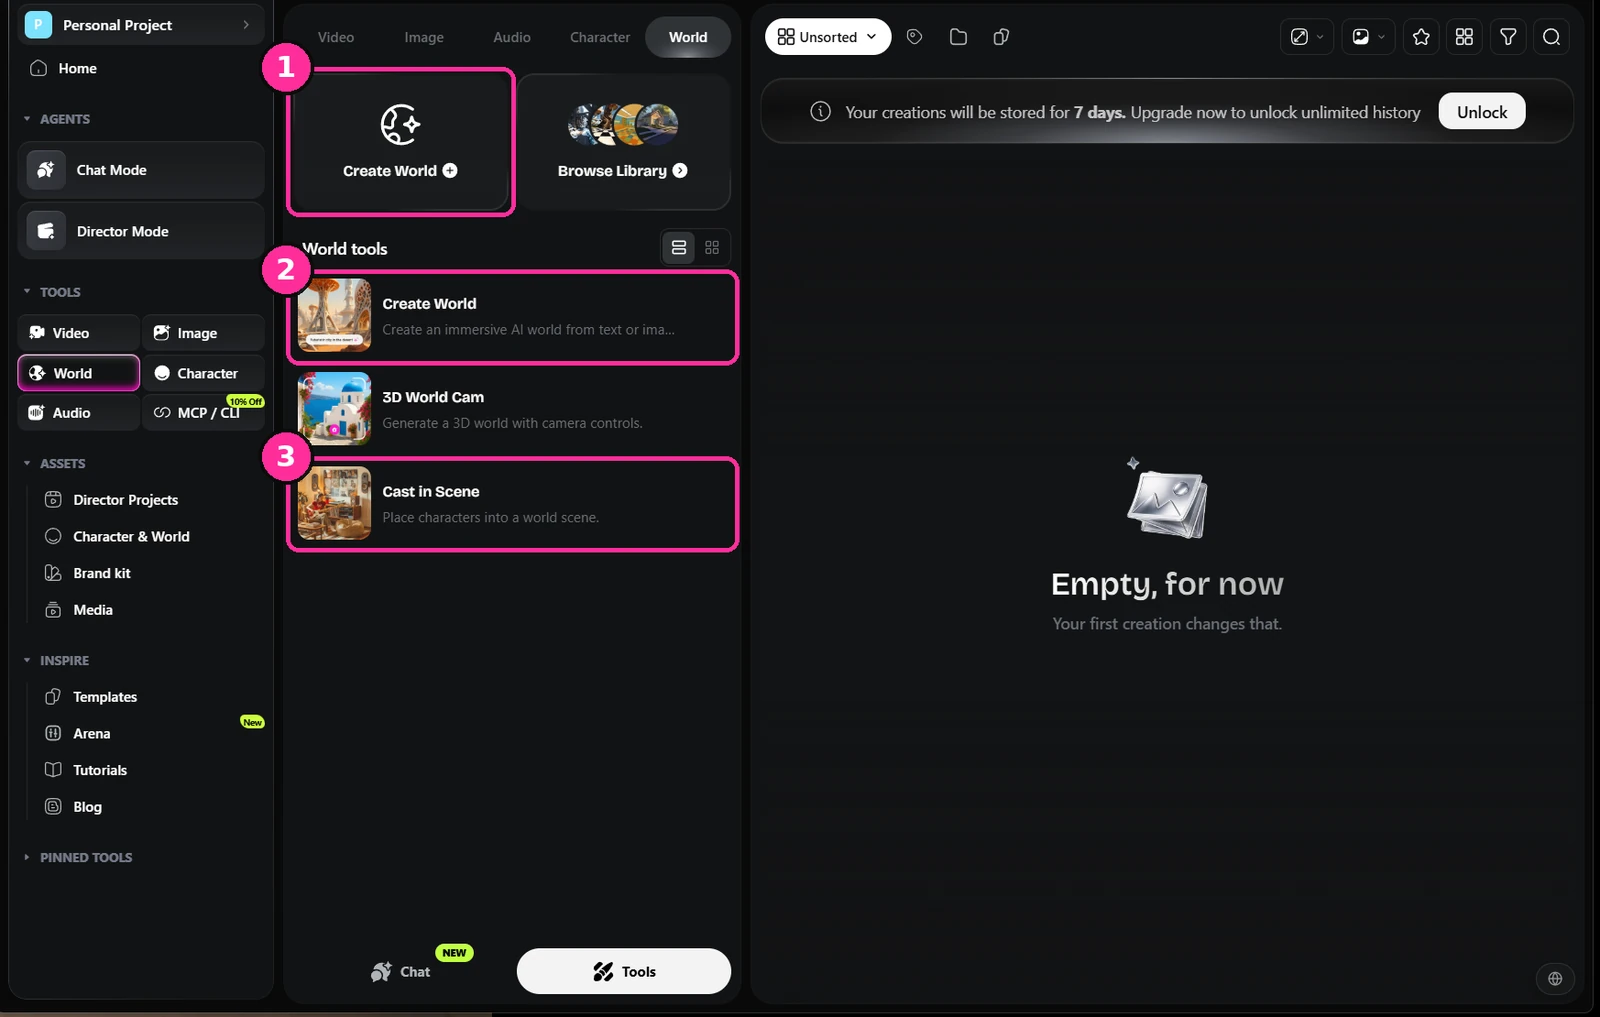
- Create World. Builds an explorable 3D environment instead of a single image.
- Create World tool. From text, or from an image you've already generated.
- Cast in Scene. Drops a locked character into a world you've already built.
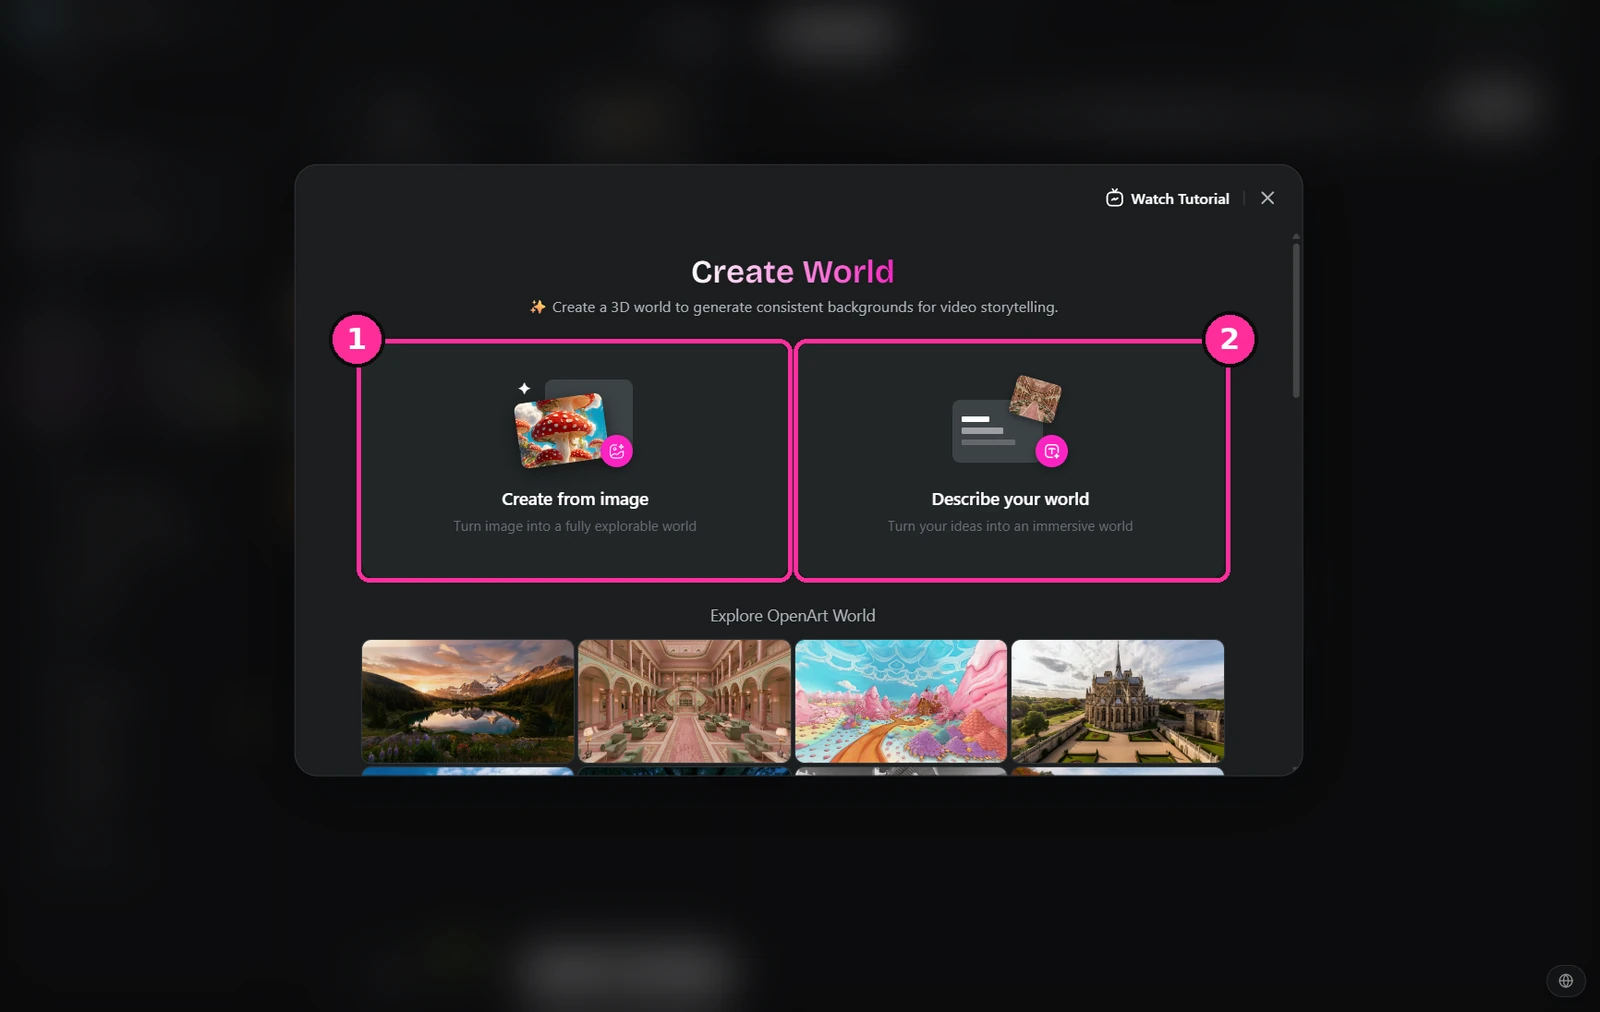
- Create from image. Feed it the still you already approved so the world matches your film.
- Describe your world. Start from text if you've got nothing yet.
Design the characters
Same tool, same models, same approach. Describe build, age, costume, hair, scars, the lot. Be specific rather than poetic. Get one image you're genuinely happy with before going any further, because everything downstream inherits it.
Don't settle for a face you're only half sold on. You'll be looking at it for the whole film.
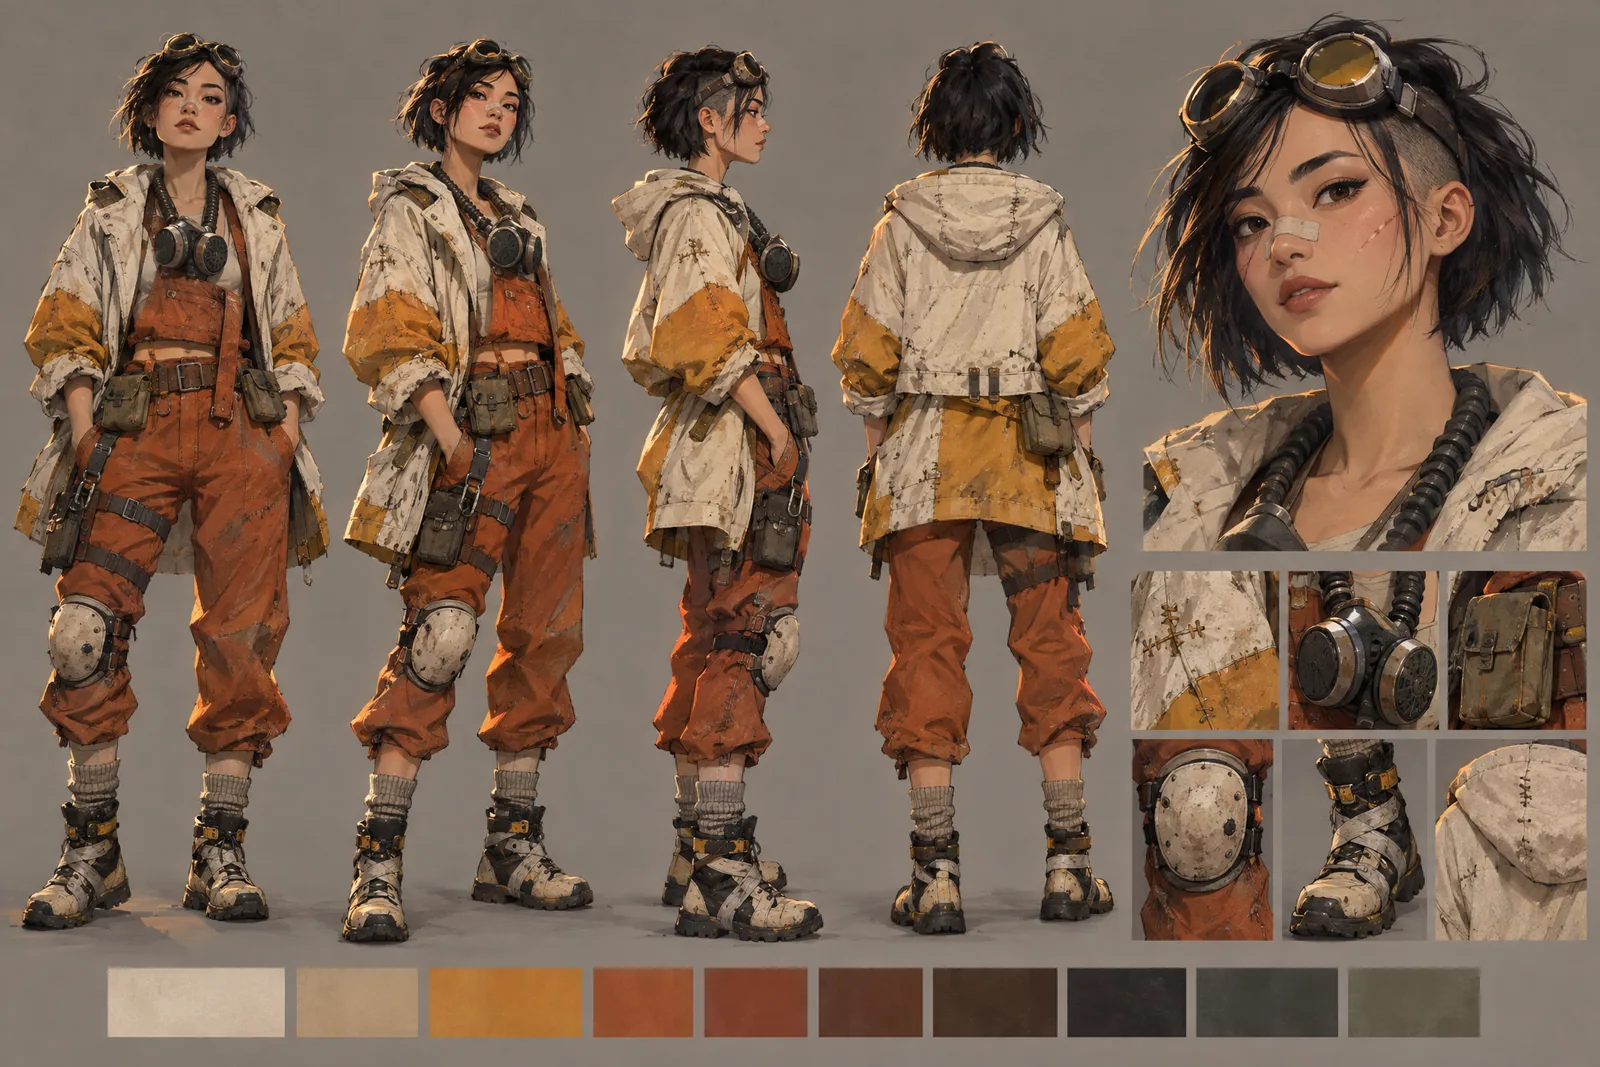
Design them against the world you've already built. This one's dressed to read against that neon.
Lock the character
Most people skip this step, and it's the one that decides whether your film holds together. From your hero image, generate a headshot at several angles and a full body turnaround, then save the lot as a character you can reuse.
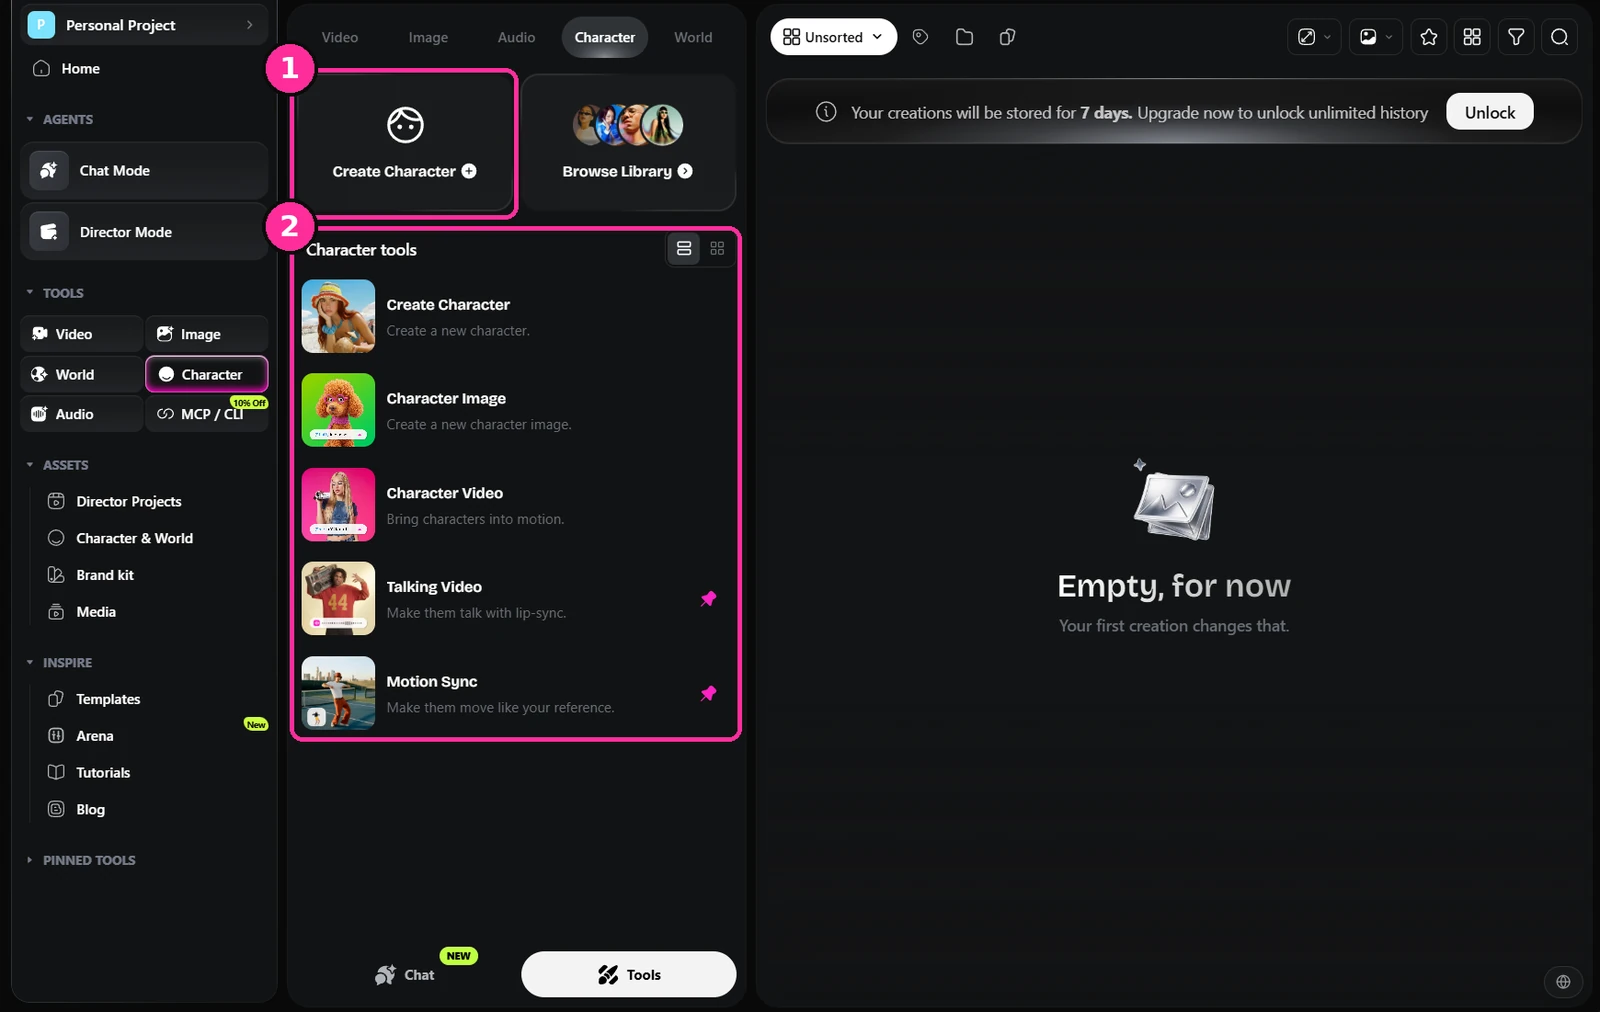
- Create Character. Start a reusable character rather than another one-off image.
- Character tools. Create, image, video, talking video and motion sync all hang off the same saved character.
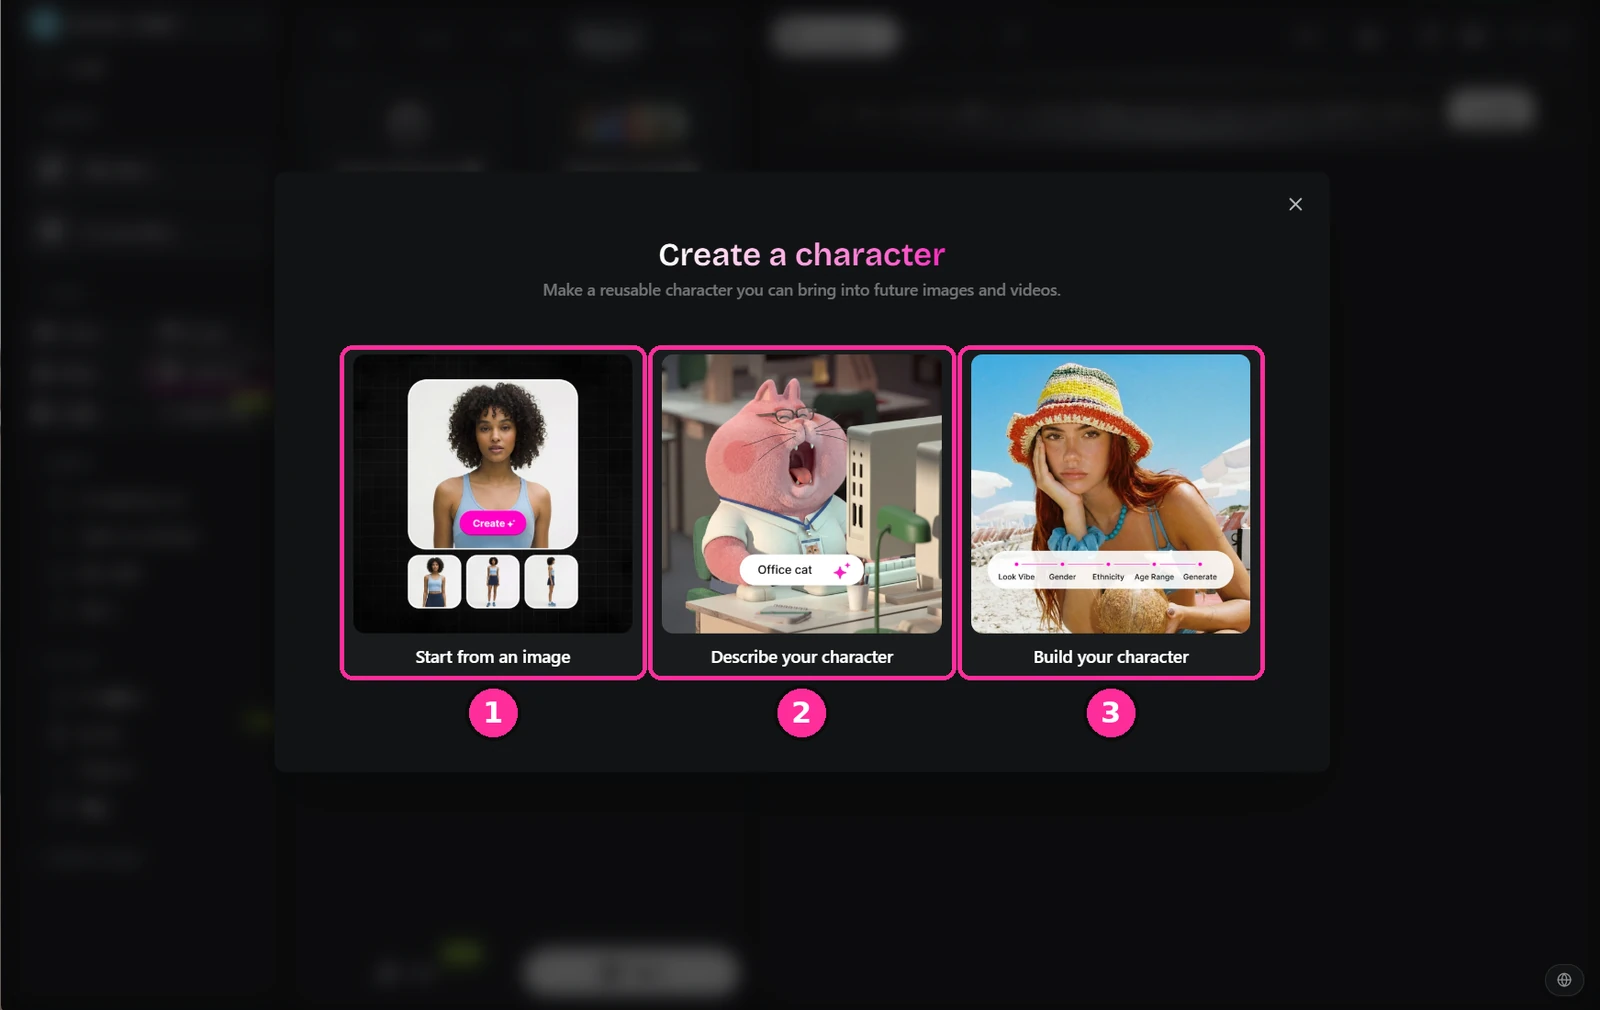
- Start from an image. The one I use. Feed it the hero image you approved in step two.
- Describe your character. Text only, if you're starting cold.
- Build your character. Guided options for look, age and so on.
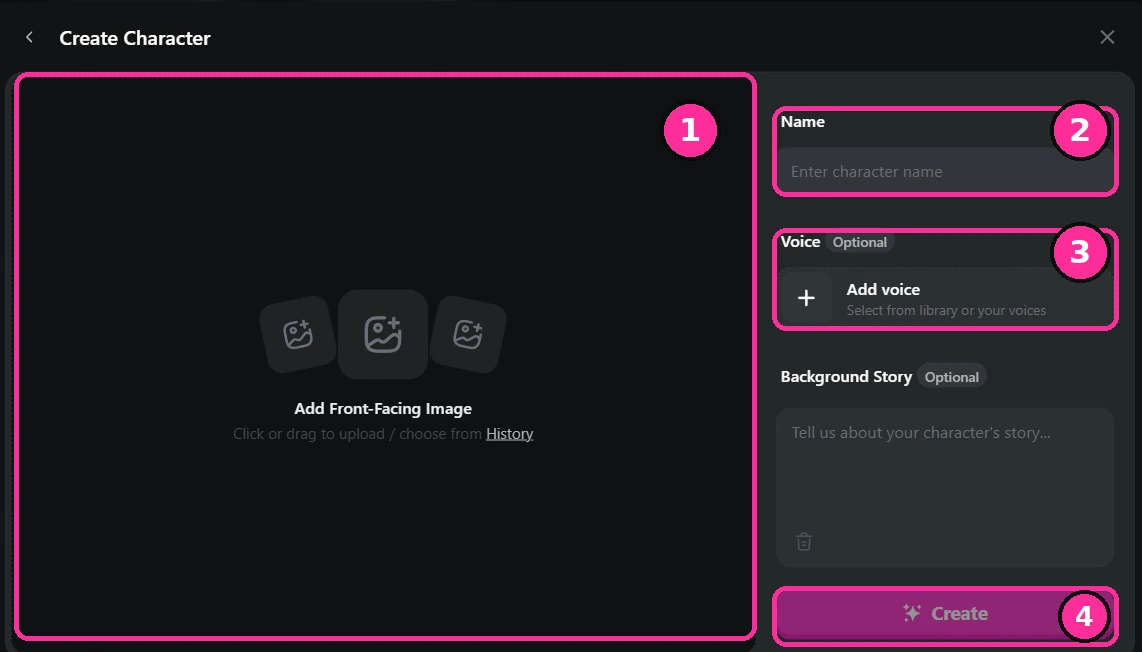
- Front-facing image. Upload the approved hero still. Front on, clean, well lit.
- Name. Name them properly. You'll be picking them off a list for the rest of the production.
- Voice. Optional here, but attaching it now saves doing it shot by shot later.
- Create. Saved into your assets and available to every tool.
A character sheet prompt works the same way as a location, with the layout spelled out first so the model puts the panels where you want them.
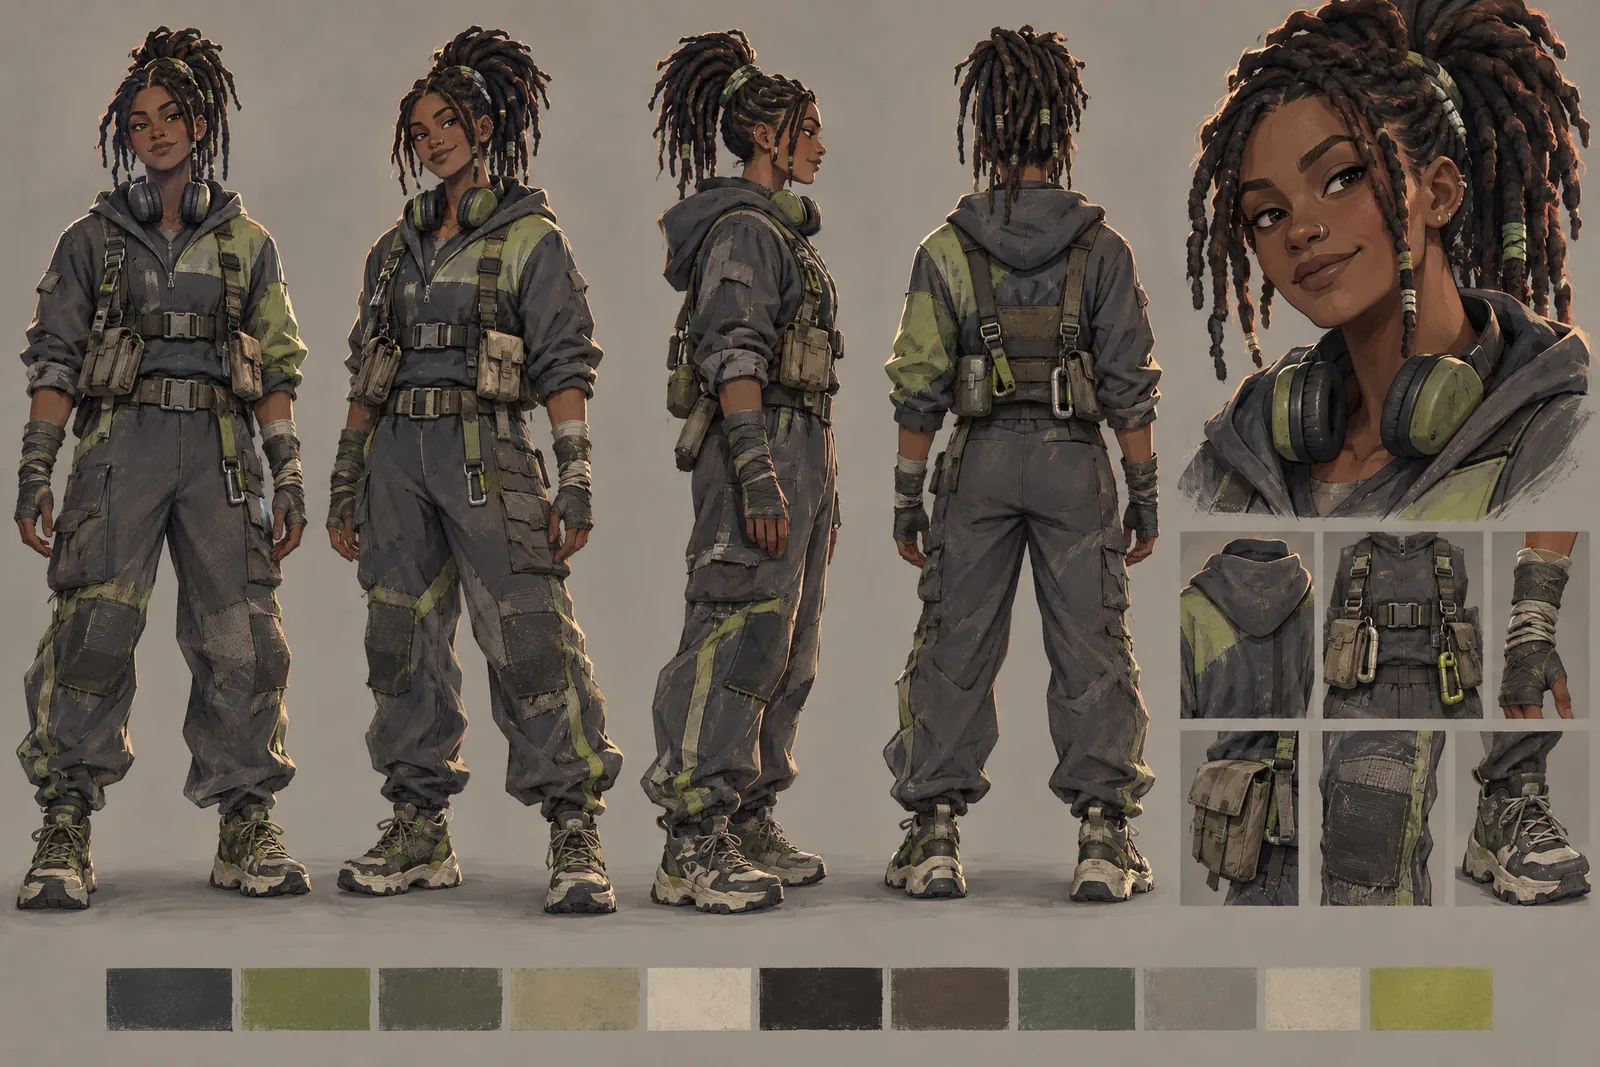
That set is your character. Feed it back on every shot they appear in and they stop drifting between cuts.
Write the scene, then attach the assets
Now write what happens. Describe the action and the performance in plain language: what they do, how they move, what they feel. Then attach your location and character references so the model builds from what you've already approved instead of inventing something new.
Generate the shot
Take the approved frame into video. Work shot by shot, not scene by scene, and expect to run a prompt several times before one lands. The keeper rate is low. That's normal, and it's still faster than a crew.
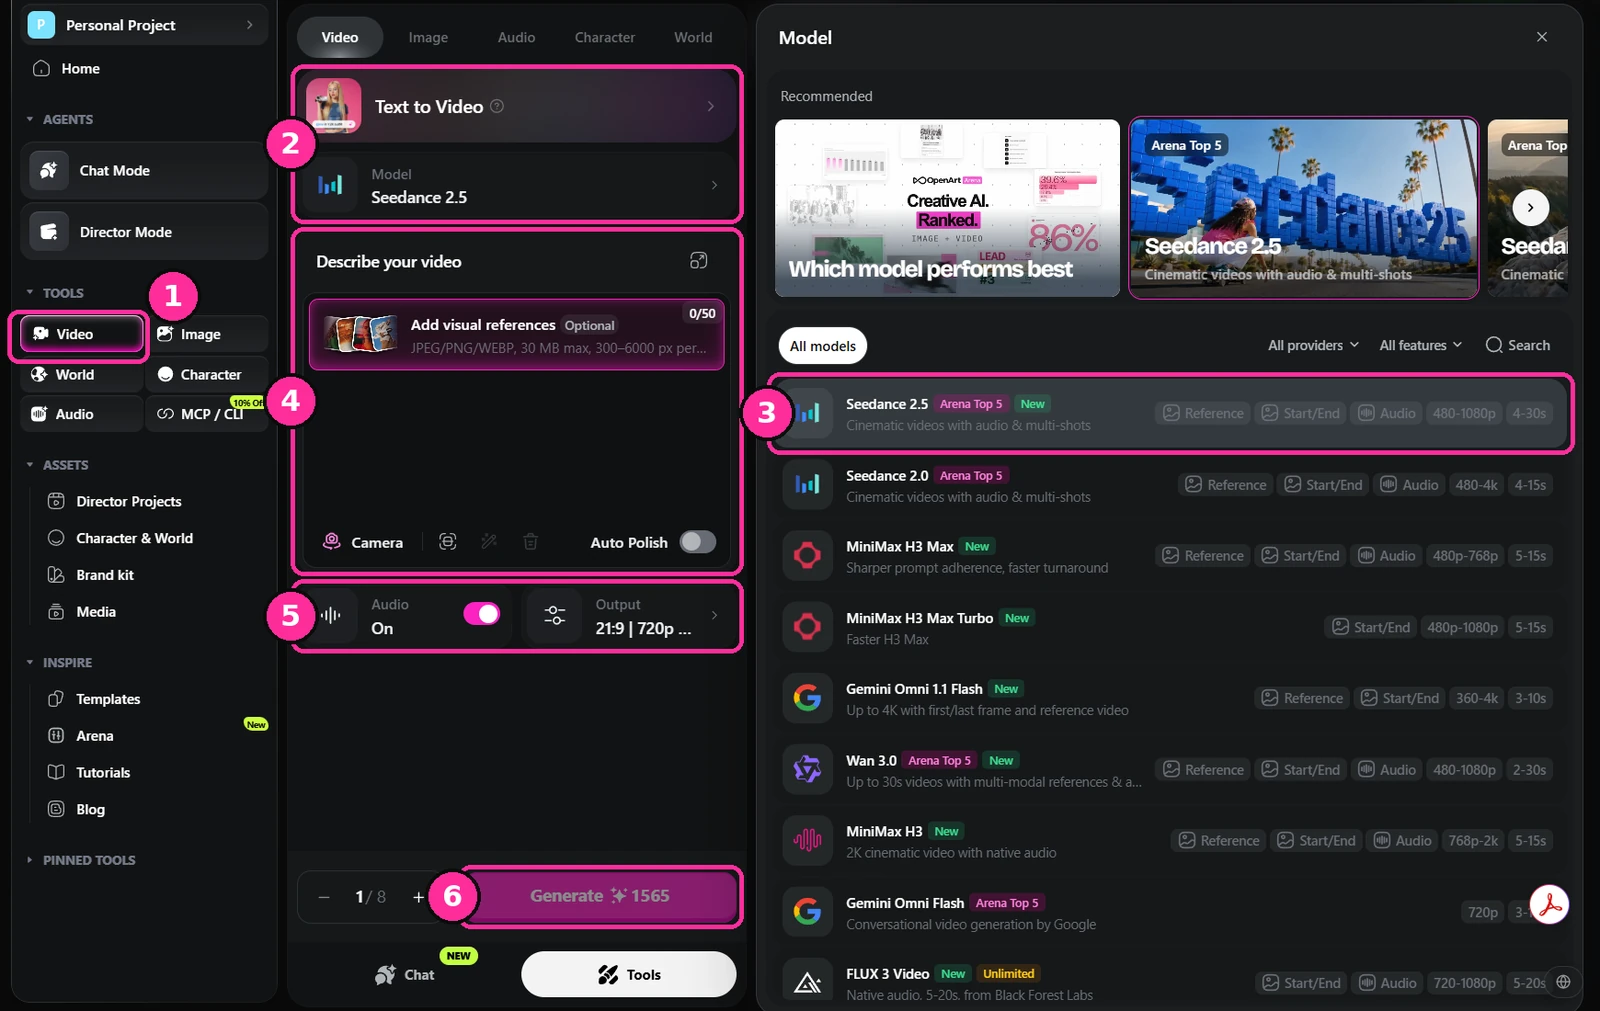
- Video. Switch to the video tool.
- Mode and model. Text to video if you're starting cold. Image to video if you're animating an approved still, which is what you should be doing by now.
- The model list. Every model shows what it supports: reference images, start and end frames, native audio, resolution and clip length. Pick on the feature you actually need.
- Prompt and references. Your scene description, with the character and location attached.
- Audio and output. Native audio on or off, plus aspect ratio and resolution.
- Generate. Note the credit cost before you commit. Video is where the credits go.
Voice and music
Both live in the audio tool, so you never leave the platform to score a scene. Voices run on ElevenLabs: pick one from the library, design one from a description, or clone your own.
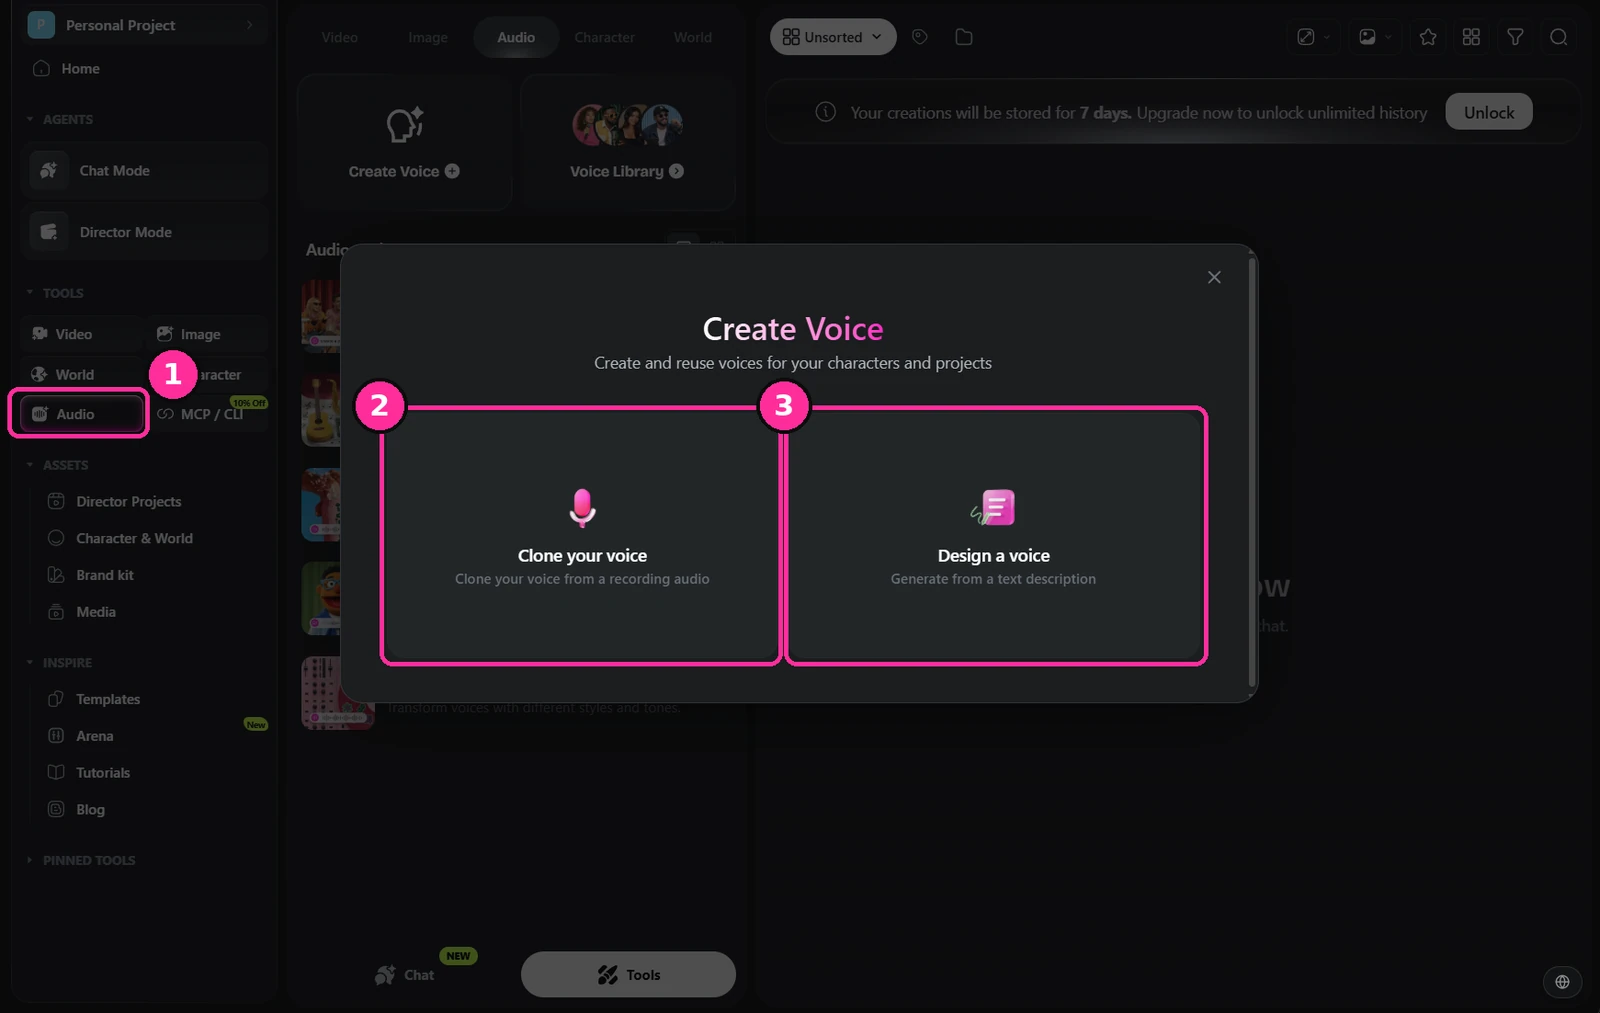
- Audio. The audio tool in the sidebar.
- Clone your voice. From a recording, if you're narrating it yourself.
- Design a voice. Generated from a text description. This is what you want for a cast of characters.
Music sits in the same place, under Create Music.
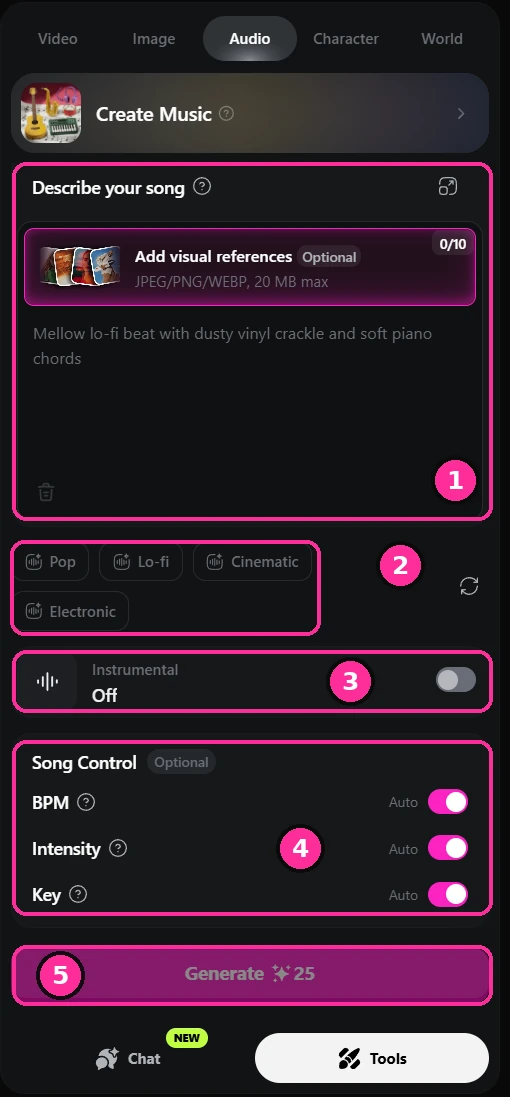
- Describe your song. Write it like a brief to a composer: mood, instruments, texture. You can attach stills so the track is written against what's on screen.
- Genre. Quick starting points if you'd rather not write from scratch.
- Instrumental. Turn this on for score. You almost never want vocals under dialogue.
- Song control. BPM, intensity and key, all on auto unless you need to hit something specific.
- Generate. Cheap compared to video, so make several and pick.
Cut, grade, deliver
This part happens outside OpenArt. Bring your clips, voice and music into a proper editor and cut it there. CapCut if you want fast and simple, Premiere Pro or DaVinci Resolve if you want control. CapCut and Resolve both have free versions that are more than enough to finish a film.
The film is made in the edit, same as it always was. Pacing, sound design and a score will do more for a scene than another round of generations. Grade last, so everything sits in the same world.
Troubleshooting your results
Don't get discouraged when a shot doesn't come out the way you pictured it. I can count on one hand the times something landed first try, and I've been doing this a while.
The job isn't to keep pressing generate and hoping. Watch what came back, work out what's causing it, then go back and refine the prompt. It might be one word. It might be a whole line. It might be something you left out entirely, so the model filled the gap for you.
Change one thing at a time so you know what did it. A single word can give you a completely different result. That cuts both ways, and once you've felt it a few times you stop rewriting whole prompts and start making one deliberate change.
The camera never moves. It sits where the reference image sat, so both characters stay small and far away and the fight plays out as two silhouettes you can't read.
The power beat runs away with it too. The frame floods green and stays flooded for over three seconds of a ten second shot. A colour flood should be punctuation, not the whole scene.
Same scene, same characters, same reference images. The camera now moves independently of the plate: in behind her shoulder, down the arm, past the bullet, into the other face.
The green beat lasts a quarter of a second and the punch lands once. Everything that made take one unreadable came from the prompt, not the model.
This isn't a finished shot and I wouldn't cut it in as it stands. It's far enough along to keep working on, which is all you want from a take at this stage.
The next pass would break it up. Right now the punch happens in one continuous move. I'd cut to her punching straight at camera, which lands harder than watching it side on, then cut again to the impact and her going back. The other note is spatial awareness: you should always know where the two of them are in relation to each other, and in the middle of the move you lose that.
Both of these came out of the same session, minutes apart, on the same settings.
Common questions
What tools do you use to make an AI film?
For images I use GPT Image 2 and GPT Image 2.5, Seedream 5.0 Pro and Nano Banana Pro. Which one I reach for depends on the shot.
For video I use Seedance 2.5 and nothing else.
Those are the models. The platform I run them on is OpenArt, which puts the image and video models in one place with the same reference images attached, so I'm not shuttling files between four sites to finish one shot.
How do you stop an AI character changing between shots?
You lock the character before you shoot anything. Generate one hero image you're happy with, then build a reference set from it: a headshot from several angles and a full body turnaround on a plain background.
That set gets attached to every shot the character appears in. Without it the model reinvents the face every generation and nothing cuts together.
Do you need a powerful computer to make an AI film?
No. The models run on the platform's servers, not on your machine, so all you need is a web browser and a decent internet connection. Nothing is installed and nothing renders locally.
The only part that touches your own hardware is the edit at the end, and CapCut or DaVinci Resolve will run on an ordinary laptop.
How much does it cost to make an AI film?
There's no honest single number, and anyone quoting you one is guessing. It moves with the model, the resolution, the clip length, and most of all how many attempts a shot takes before it lands.
You pay in credits per generation, whether or not what comes back is usable. Plan for several goes at a shot, not one.
The one thing that reliably cuts the bill: test at low resolution, and only go full resolution for the take you're actually keeping.
How long is a single AI video clip?
Seedance 2.5, the one I use, will generate anywhere from 4 to 30 seconds in a single pass. Most other models are shorter, so check the limit before you commit to a shot length.
That's how much continuous shot you get in one generation, not how long your film can be. A finished film is still assembled shot by shot in an editor, same as any other film.
Once the shots are generated, is the film finished?
No. What comes out of the model is raw footage: individual shots, in no order, with no pacing and no sound design. It's closer to what you'd have at the end of a shoot day than to a film.
The film gets made afterwards in an editor: choosing which takes to use, cutting them together, timing the beats, laying in music and sound, and grading everything so it all sits in the same world.
That part hasn't changed at all, and it decides whether the result feels like a film or a showreel. CapCut and DaVinci Resolve both have free versions that'll do every bit of it.
Can you put AI films on YouTube?
Yes, AI films are allowed. YouTube asks you to disclose it when the content is realistic enough that someone could mistake it for real. That's a toggle in the upload flow, under Altered or synthetic content.
Channels get into trouble for mass-produced, repetitive uploads with nothing original in them, not for using AI.
These rules change, so check YouTube's own page rather than taking mine as current: Disclosing use of altered or synthetic content.
Why does the model ignore part of my prompt?
Because the model takes the shortest route to something that matches what you asked for. Leave a part of it vague and it decides for you, and it always picks the easiest thing to produce. The camera stays put. The character stays where they are. The difficult thing quietly doesn't happen.
So you have to push it down the harder road. Be explicit about the thing you actually care about and leave no room to substitute something simpler.
When something is being ignored, change one thing and generate again so you know which word did it. Rewriting the whole prompt tells you nothing.
That's most of the craft right now. I expect it'll get easier, but today you really do have to push it into doing the difficult version.
Which AI models are actually the best right now?
It depends who's judging, and what for. The one I pay attention to is OpenArt Arena, because it's judged blind by working directors and artists rather than by public vote, and because it's split by job: film, ads, animation, motion design, lip sync, e-commerce, graphic design. A model that wins on ads isn't necessarily the one you want for a film.
The film boards are the ones that matter here. The strip at the top of this page is a live snapshot of the top three for film video and film image, pulled from their leaderboard, so it shows what's true today rather than when I wrote this.
One thing worth more than the rankings: the top of a leaderboard isn't the same as the right model for your shot. I use Seedance 2.5 for all my video work because of how it handles reference images and how long a clip can run, not because of where it sits on a board.
J2 industries has a commercial relationship with OpenArt and may earn a commission from links on this page. The workflow above is the one we use on our own productions.